December 31, 2011

"Choose the Right Way" Singing Time

I'm really excited for the new year in Primary! It always feels good - sort of a "return" to the normal routine. Well, at least in a few weeks it will feel that way. I'm sure the next 2 weeks will be a little hectic as everyone adjusts to new teachers/classrooms/etc.


Because the first couple weeks are always hectic enough with all the changes (and because we have 5 whole Sundays in January this year), I'm choosing to wait a couple weeks to introduce "As a Child of God."

I am, however, wanting to teach a new song. I just thought I'd stick with one that is a little shorter & easier to learn (and some of the kids might already be familiar with it!)

First, I made a new CTR shield out of foam board (thank you Dollar Tree for selling foam board for only $1!)

I made a pattern with a good ole' paper grocery sack & traced in onto the foam board.


Then, I cut it out with my electric knife - this makes for super easy & smooth foam board cutting.

Spray paint it (with a fairly thin layer of spray paint) green & while it's drying I used my paper sack shield to sketch my letters. I used white contact paper for my letters - because I just happened to have it. No reason you couldn't just use paper though.

Add the letters to the shield and a simple duct tape handle on the back... TA DA! A nifty little CTR shield I plan to use repeatedly this year!


This is how I plan to use it tomorrow:

To teach the primary song, Choose the Right Way

I love flipcharts... the convenience/space-saving/simplicity of them. But I really like VARIETY (and I'm pretty sure the kids like it even more than I do...) So, I try to think of creative ways to teach the songs. (Even if it means I have to haul posters, shields, dress-ups, and countless other awkward-items-to-carry, to church each week.)


Tomorrow I want to introduce the theme for the year and our primary's new CTR shield. I'll ask what it means to "choose the right." And how does it make you feel when you choose the right?

I'll have the pictures (without the words) displayed on the board. I'll tell them I need their help *choosing* the pictures that match each phrase of the song (encouraging them to listen closely while I sing the song).

After I've sung it for them, I'll have them help me pick out what pictures go with each phrase, and we'll attach them to the shield.


I'll have little CTR shield pictures hanging on the walls around the room for me to choose helpers to "find" them. Each will have a little scenario that I will read and let the children tell me what the right decision would be - followed by an appropriate song.

When introducing new songs I like to alternate like this {introduce song & sing through it a couple times, then start the activity, sing a familiar song, activity, new song, activity, familiar song, activity, new song, etc.}


If you're interested in the pictures I used (you could really even print this off and use it as a flipchart if you feel so {inspired}) you can access it here: (sorry a couple pages are in the wrong order... oops)

https://docs.google.com/open?id=0B2l2U-HcMHWjZjYwMDNmNDAtMzUwNi00MWNlLTg5ZWEtNGE3YzNiMTJjOTY4


Photobucket

Posted by Picasa

December 30, 2011

Activity Countdown to 2012

After seeing several super fun & creative countdown ideas on Pinterest, I felt {inspired} to be a better mom and make this New Years Eve - a holiday I generally associate with adults - fun for my kiddos!

So, I came up with this:


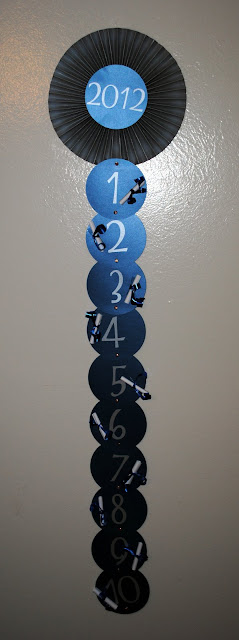
A simple, but cute, activity countdown for a little family fun!

I decided to do 10 activities (get it? 10-9-8-7-6-5-4-3-2-1-HAPPY NEW YEAR!) But, instead of counting down to the actual New Year (my kids are a little TOO little to stay up until midnight), we'll be counting down until it's time to go to our family party! Each little scroll has a fun activity to enjoy as a family.


Each hour, starting at 10:00am, we'll do an activity. I'm thinking we'll do the fun activity and then have a task we have to complete before the next hour in order to be able to open the next scroll... might as well use it as a good incentive to get some chores done, right?

Here's the activities I chose (in no particular order):

Play ring around the rosies
Make a cheese ball (for the party)
Read a book
Finger paint
Balloon Ping-Pong (link)
Dance with Streamers
Take a family picture
Make sock snowmen (link)
Go to honks (a local dollar store - partially to buy the rest of the supplies needed for our sock snowmen)
Make Pigs-in-a-blanket for lunch

I started out using my handy Cricut to cut out circles & numbers


I knew I wanted to use Brads - but I only have the cheap-o gold ones... so I got creative. A little fingernail polish gave them just the sparkle I wanted it!


I simply took an old sour cream container and taped a piece of scrap paper with holes punched in it to the top. That way the brads would be held steady for me to paint & let dry. New Years Eve is definitely a time for SPARKLE! {I found the glittery nail polish to be perfect!}


To make the accordion-style circle I had to get creative, once again, as I was unable to find my scoring tool... it turns out the dull side of a razor blade works BEAUTIFULLY for scoring!


I used three 4x12 inch segments of paper, scored every 1/2 inch to make my medallion.


Overlap & glue the ends together to form a circle


and add the middle circle:


Next, punch holes into each of the countdown circles & connect with your fancy new brads


Get your activities all printed out and ready to go


Make your scrolls


Attach the scrolls to the countdown


Hang up and get ready for some fun!


My 4 year old is already excited for {our} countdown!

Sounds to me like a good way to end 2011!


December 28, 2011

Resolutions

Last January, my sister-in-law shared a brilliant idea - Turn your goals into a game! Face it. Accomplishing goals is a lot easier when you have rewards involved. And the excitement of setting & working towards goals in January is more likely to continue if you make it fun. So, I present to you my {inspiration} for 2012 goals:


Bingo Goals
http://www.scribd.com/fullscreen/76827281?access_key=key-1as35kium3boy8qn4j8h

Download, print & fill in your goals. You can be creative. Be specific. And don't forget to assign  rewards for each bingo reached & a bigger reward for when you blackout!

I always like to find some quote/scripture/{inspiration} of sort to focus on while setting my goals. While searching for my motivation this year, I came across a talk given by a leader of the Church of Jesus Christ of Latter Day Saints. I began reading the address and it seemed extremely familiar. I looked at the date it was given and realized that it was familiar - although given nearly 10 years ago - because I was there when it was given. "Pathways to Perfection." If you're interested, you can find a copy here.

Or, if you're not interested in reading the entire talk (although, I would highly recommend it) Here are a few of my favorite parts:

"The battle for self-discipline may leave you a bit bruised and battered but always a better person. Self-discipline is a rigorous process at best; too many of us want it to be effortless and painless. Should temporary setbacks afflict us, a very significant part of our struggle for self-discipline is the determination and the courage to try again."


"...decisions determine destiny..."


"Our Heavenly Father has given to each of us the power to think and reason and decide. With such power, self-discipline becomes a necessity."


"President J. Reuben Clark, many years ago a counselor in the First Presidency, said: 'I believe that we are here to work, and I believe there is no escape from it. I think that we cannot get that thought into our souls and into our beings too soon. Work we must, if we shall succeed or if we shall advance. There is no other way'"


Happy Goal Setting!


Quiet Book Pages

As I've been trying to get this blog up & running, I've been racking my brain trying to think of projects to do.


 What?
This is supposed to provide INSPIRATION, not frustration (and hence, a total lack of creativity).

So, I made a decision. Although this project is not anywhere near finished, I will post what I do have done on this quiet book.

I have two boys. Two YOUNG boys. When I started thinking about making a quiet book I knew "one" would not be enough. So, I developed this plan:

Make LOTS of pages that can be hooked together with metal rings or even in a three-ring-binder. That way I can have two books that can have pages rearranged & shared between them.

I started by making a list, looking for ideas all over online, talking to my experienced mother, etc.

The end of the plan was supposed to be having these completed by Christmas - to give to the boys.

The plan, however, did not include my youngest getting extremely sick (possibly pneumonia), the week of Christmas. Hence, this gift was given as a work-in-progress. We did, however, take what was finished to church with us on Christmas and the boys seemed to enjoy them. (whew, good thing after all that work)!

I chose to use muslin for the pages and cut them to 9x11.5 (so, finished they would be approximately 8.5x11) so they will fit well in a three-ring-binder. I used very little felt because I don't like how it pills up.

Ok, enough chit chat. On to the pics:

Counting: Watermellon seeds.


Basic tic-tac-toe page

Tee-Pee page. Zipper skills. Little army-type-men inside.


Weaving page.

Train cars to hold finger puppets. {LOVE my Cricut! Train page (train & swirl from the "Playtime" cartridge)}


Brush the monkey's teeth (still need to make the toothbrush)


Match the shapes (velcro). I actually thought I'd try shapes made out of fun foam from the dollar store. I figure it's cheap to replace (if I need to) but should hold its shape better than felt.

I'm also a fan of having storage on each page for any little peices. Hence, the pocket at the bottom of the page.

Tick-Tock clock page (still need to make the hands)

Football tying page


Large pocket/backpack page to hold any extra shapes & a little snack for the boys to find.


Match the colors flower page - the pot doubles as a pocket for the flowers.

This is just a start. I have many more pages in mind and will share them once they are finished.

If you have questions about specific pages, feel free to leave a comment and I'll try to answer your questions or give instructions where needed. Thanks for lookin'! Hope I've provided a little inspiration!
Posted by Picasa

December 15, 2011

The Stockings were hung...


Here's my version of a craft that has been done many times before. For that very reason, I won't take the time to give you step-by-step instructions.

I've wanted to make one for quite a while and finally got around to it this year. Thanks to my Cricut & SCAL (Sure Cuts A-Lot) software, I was able to choose a favorite font to use for the vinyl.

I painted the wood ivory and used hunter green vinyl for the words.

Instead of using dowels, I used kitchen knobs I found on clearance at Ikea. My handy hubbie helped route the edges and drill the holes for the knobs.

Our stockings sure looked cute hanging from this!
Posted by Picasa

December 14, 2011

"Dad Gum!"

I could not be happier about how this little cake turned out for my son's 3rd birthday! Mater was a big hit - for my 3 year old and all his grandparents! One nice thing about a Mater cake is it doesn't have to be perfect because, Mater is, shall we say, a little rough around the edges...


Sorry, no step-by-step pictures. But here's the gist of how I made it:

I baked a cake (I actually ended up using 2 cake mixes because the 1st cake was so crumbly, but you should be able to do it with one cake mix) in 3 bread pans. Just divide the batter evenly between the three pans. Remove from pans after cooling for about 10 minutes and let cool completely before assembling & decorating. Once cooled, I stacked 2 of the 3 for the main (largest) part of the cake (just using a thin layer of chocolate frosting as the filling). I cut the 3rd cake into three even sections and stacked 2 sections together for the cab. I frosted the whole thing with chocolate frosting and then used:

1. marshmallow fondant to make the whites of the eyes & the buck teeth (there are several great tutorials available online if you just do a google search).
2. a smooshed mini marshmallow for the headlight (poke it into the frosting on the other side first where Mater has a broken headlight)
3. small chocolate donuts ("donettes") for the wheels
4. kit kat bar cut in half and put on 2 toothpicks for the side view mirrors
5. another kit kat bar for part of the engine
6. a reeses peanut butter cup for the round part of the engine
7. large googly eyes (put a dab of frosting on the back to stick them onto the fondant)
8. a clothes pin for the tow
9. a shoelace for the tow cable (I promise it was a new, un-used lace)
10. crumbles up graham crackers for the "dirt road" (spread a thin layer of frosting over your plate/dish holding the cake and sprinkle cracker crumbs over the frosting to look like dirt)


Quite Simple and pretty darn cute... "Dad gum!" that's my kind of project!


Posted by Picasa